Table of Contents
ToggleTransforming a master bedroom into a luxury retreat doesn’t require tearing down walls or hiring a celebrity designer. It’s about thoughtful upgrades, layering textures, controlling light, and choosing finishes that feel intentional. Whether you’re working with a suburban primary suite or a downtown condo, these strategies focus on achievable projects that deliver high-impact results. The goal isn’t to replicate a showroom but to create a space that feels restful, personalized, and built to last. Most of these improvements are within reach of confident DIYers, though some electrical work and structural changes may require permits or professional help.
Key Takeaways
- Luxury master bedroom ideas start with premium bedding using 300–600 thread count long-staple cotton or linen, layered with a quality mattress and padded headboard for a hotel-inspired foundation.
- Statement walls using board-and-batten, wood slats, or upholstered panels create visual anchor points without requiring extensive decoration or structural changes.
- Implement three-layer lighting (ambient, task, and accent) with warm 2700K–3000K dimmers, wall sconces, and LED strips to balance function and ambiance across your luxury master bedroom.
- Choose high-end, durable materials like engineered hardwood flooring, wool carpeting, ceiling-mounted drapery, and solid brass hardware that age gracefully and signal intentional design.
- A dedicated seating area with an upholstered lounge chair and proper task lighting transforms the bedroom into a true retreat beyond just sleeping quarters.
- Smart technology integration—such as dimmers, motorized shades, and smart thermostats—should enhance comfort and convenience without over-complicating daily routines.
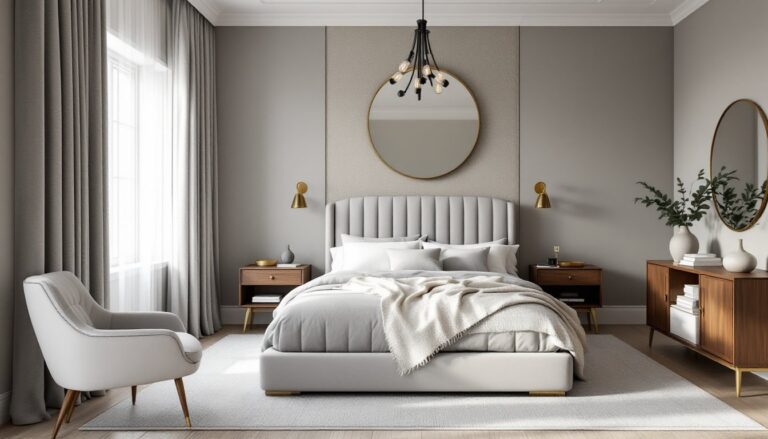
Create a Hotel-Inspired Retreat with Premium Bedding
High-end hotels invest heavily in bedding because it’s the first thing guests notice. Start with thread count in the 300–600 range, anything higher often sacrifices durability for marketing. Long-staple cotton (Egyptian or Pima) or linen offers the best balance of softness and longevity.
Layer the bed with a duvet insert (minimum 600 fill power for down, or high-density microfiber for allergies) inside a washable cover. Add a quilted coverlet or lightweight blanket at the foot for temperature control. European shams (26″ square) and king shams create visual depth, even on a queen bed.
Mattress quality matters more than any decorative element. Look for individually wrapped coils or high-density memory foam (4 lb/ft³ or higher). Pair it with a breathable mattress protector, waterproof but not vinyl-backed, which traps heat.
Finish with a padded headboard. If you’re building one, use 1×4 pine furring strips for the frame, 2″ high-density foam, and batting over ¾” plywood. Upholster with performance fabric (treated for stain resistance) and secure to wall studs with French cleats for a floating look. This project takes a weekend and costs $150–$300 depending on fabric choice.
Design a Statement Wall That Commands Attention
A statement wall anchors the room and eliminates the need for excessive décor. Board-and-batten or picture molding delivers classic luxury. For board-and-batten, install 1×2 or 1×3 poplar boards vertically at 16″ on center over a painted base wall. Use a pneumatic brad nailer (18-gauge) and fill holes with lightweight spackle. Prime with stain-blocking primer before finish coats.
Wood slat walls (horizontal or vertical) add warmth and texture, popular in resort-inspired interiors. Use 1×2 or 1×3 boards spaced 2″–4″ apart, mounted to a cleat system or directly to studs. Stain or paint before installation to avoid gaps in coverage. A miter saw gives cleaner cuts than a circular saw for repeated precision.
For a softer look, try upholstered panels. Cut ½” MDF to size (typically 24″×36″ or 30″×48″), wrap with 1″ foam and fabric, staple tightly on the back, and mount with Z-clips or French cleats. This avoids visible hardware and allows easy removal.
Wallpaper works if the wall is smooth, skim-coat any texture first with joint compound. Peel-and-stick varieties simplify install but won’t last as long as traditional paste. Choose grasscloth, silk-texture vinyl, or large-scale geometric patterns. Avoid busy prints that compete with bedding.
Incorporate Ambient Lighting Layers for Ultimate Comfort
Luxury bedrooms use three lighting layers: ambient (overhead), task (reading), and accent (highlighting texture or art). A single ceiling fixture won’t cut it.
Replace builder-grade fixtures with a flush-mount or semi-flush ceiling light rated for LED bulbs, 2700K–3000K (warm white). Install a dimmer switch, most require a neutral wire, so check your junction box first. If you’re adding recessed cans, space them 4–6 feet apart and use IC-rated housings if there’s insulation above. This is straightforward electrical work, but if you’re unfamiliar with circuits, hire a licensed electrician. Most jurisdictions require permits for new circuits.
Wall sconces on either side of the bed eliminate nightstand clutter. Mount them 60″–66″ above the floor (about 24″ above mattress height). Hardwire if studs align: otherwise, use plug-in sconces with decorative cord covers. Adjustable-arm or swing-arm styles suit reading.
LED strip lighting behind floating nightstands, under a tray ceiling, or along crown molding adds soft glow. Use 24V strips (more stable than 12V over distance) and a compatible driver. Stick to CRI 90+ for accurate color rendering. This often requires running low-voltage wire through walls, check local code for Class 2 wiring.
Add a statement chandelier or pendant if ceiling height allows (minimum 7 feet clearance above the floor). Designers often emphasize layered lighting schemes to balance function and mood in high-end bedrooms.
Add a Luxurious Seating Area or Reading Nook
A dedicated seating area signals that the bedroom is more than a place to sleep. If you have 100+ square feet, carve out a corner with an upholstered chair, small side table, and floor lamp.
Choose a lounge chair with a sturdy hardwood frame (oak, maple, or birch) and high-resilience foam cushions (2.0 lb density or higher). Avoid particleboard frames, they sag quickly. Velvet, linen, or performance fabrics hold up better than cotton blends.
For reading nooks, add a tripod or arc floor lamp with a 3-way LED bulb (50/100/150W equivalent) for adjustable light. Position it so the bulb sits slightly behind and to the side of the reader’s shoulder to avoid glare.
If space is tight, a window seat built over a radiator or low wall works well. Frame it with 2×4 studs, top with ¾” plywood, and add a 3″ foam cushion covered in durable fabric. Include a hinged lid for hidden storage. Secure to wall studs with 3″ construction screws. This project suits intermediate DIYers and takes a long weekend.
Layering textures found in waterfront home designs often inspires cozy, layered seating zones that feel intentional rather than cluttered.
Choose High-End Materials and Textures
Luxury is tactile. The materials you choose should feel substantial and age well.
Flooring: Engineered hardwood (¾” thick with a 4mm wear layer) holds up better than laminate and can be refinished once. Wide planks (5″–7″) feel more upscale than narrow strips. If keeping carpet, upgrade to wool or wool-blend with 8–10 lb padding underneath. Avoid polyester, it mats quickly.
Window treatments: Linen or velvet drapes hung from ceiling-mounted rods (not mid-window) elongate walls. Use ripplefold or pinch-pleat headers for a tailored look. For blackout capability, line with 3-pass thermal backing. Motorized tracks add convenience but require low-voltage wiring and a licensed electrician if hardwired.
Trim and molding: Upgrade baseboards to 5¼” or taller and add crown molding (3½”–5½”). Use MDF for paint-grade (cheaper, no knots) or poplar for stain-grade. Cope inside corners with a coping saw instead of mitering, it hides gaps better as the house settles.
Hardware: Swap out plastic drawer pulls and door handles for solid brass or stainless steel. Satin or brushed finishes hide fingerprints better than polished. This is a one-hour upgrade that completely changes the room’s feel.
Accent textures: Add a sheepskin rug, chunky knit throw, or linen bench cushion. These aren’t structural, but they signal attention to detail. Many high-end design galleries featured on homebunch.com highlight how mixing natural and refined textures creates visual richness.
Integrate Smart Technology for Modern Convenience
Smart tech should simplify your routine, not complicate it. Focus on systems that integrate smoothly and don’t require a degree in IT.
Smart lighting: Replace standard switches with smart dimmers compatible with LED bulbs. Lutron Caseta and Leviton Decora are reliable and don’t require a neutral wire in most configs. Pair with a hub or voice assistant for scheduling and scene control. You can program “goodnight” to dim all lights and lock doors.
Motorized shades: These require low-voltage wiring or battery power (rechargeable lithium packs last 6–12 months). Hardwired options are cleaner but need planning during rough-in. Brands like Somfy and Lutron offer quiet motors. Budget $400–$800 per window installed.
Climate control: A smart thermostat with remote sensors (Ecobee, Honeywell) prevents the bedroom from overheating or freezing. Place the sensor on a nightstand or dresser, away from windows and vents. Installation is DIY-friendly if you have a C-wire: if not, use a C-wire adapter or call an HVAC tech.
Ceiling fans: A DC motor ceiling fan with smart controls runs quieter and uses 70% less energy than old AC models. Install with a fan-rated junction box (must support 50+ lbs dynamic load). If the box is plastic, replace it with a metal pancake box anchored to a joist. This is a common code violation, don’t skip it.
Charging stations: Recess USB outlets into nightstand walls (requires cutting drywall and fishing wire) or use pop-up outlets in the nightstand top. For a cleaner look, mountain home designs often hide charging docks inside drawers with cord pass-throughs drilled in the back.
Avoid over-automating. You don’t need a smart mirror or app-controlled pillows. Stick to tech that genuinely improves sleep quality and daily function.
Conclusion
Luxury in a master bedroom comes from intentional choices, upgraded materials, thoughtful lighting, and finishes that feel cohesive. Most of these projects fit within a DIYer’s skill set, though some electrical and structural work may need professional input. Prioritize comfort and durability over trends, and the space will feel high-end for years, not just one Instagram post.