Table of Contents
ToggleSmall bathrooms often get written off as purely functional spaces, but their compact footprint actually makes them ideal candidates for luxury upgrades. A 5×8-foot bathroom costs far less to tile in marble than a sprawling primary suite, and high-end fixtures feel more cohesive when they aren’t scattered across a large room. With smart material choices, intentional lighting, and a few statement features, even a powder room or apartment bath can deliver the kind of refined experience typically reserved for spa retreats. This guide walks through actionable strategies to elevate a small bathroom without blowing the budget or sacrificing usable space.
Key Takeaways
- Luxury small bathroom ideas work best when premium materials like marble, quartz, and large-format tile are concentrated in compact spaces, delivering visual richness without the high cost of upgrading larger rooms.
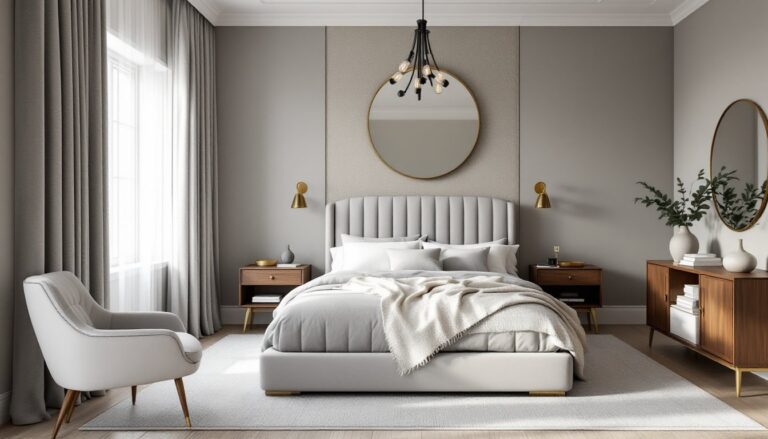
- Wall-mounted vanities, floating designs, and frameless glass enclosures maximize usable floor space while maintaining an upscale, spa-like aesthetic.
- Layered lighting—ambient, task, and accent—transforms small bathrooms into inviting spaces; side-mounted vanity sconces and dimmer switches provide both functionality and luxury feel.
- Neutral monochromatic color palettes or bold, dark tones paired with high-quality finishes create cohesion; limiting metal finishes to two maximum prevents visual fragmentation.
- One or two statement features—such as heated radiant floors, backlit mirrors, or a freestanding soaking tub—make a stronger luxury impact than multiple minor upgrades in tight quarters.
- Small bathrooms phase well for renovation, allowing homeowners to upgrade fixtures and materials incrementally while maintaining strong resale value.
Why Small Bathrooms Are Perfect for Luxury Upgrades
Small bathrooms offer a unique advantage: every square foot counts, which means premium materials and fixtures don’t require the same investment as larger rooms. A single slab of book-matched marble might cover an entire accent wall in a 40-square-foot powder room, whereas the same approach in a 120-square-foot primary bath would triple the cost.
The confined space also creates natural cohesion. High-end finishes, polished nickel hardware, hand-glazed tile, thick quartz counters, feel intentional rather than scattered. There’s less room for visual clutter, so each element carries more weight.
From a practical standpoint, small bathrooms are easier to update in phases. Homeowners can replace a builder-grade vanity with a wall-mounted floating unit one month, then upgrade lighting the next, without the project sprawling into a multi-week renovation. Structural constraints (existing plumbing, electrical, and ventilation) usually remain manageable, keeping permits and contractor involvement minimal for cosmetic work.
Finally, resale value holds steady. Buyers expect functional, well-appointed bathrooms, and a thoughtfully upgraded small bath often outperforms a dated larger one in perceived quality. The return on investment for materials like natural stone, frameless glass, and quality plumbing fixtures remains strong in compact spaces.
Premium Materials That Maximize Small Bathroom Elegance
Material selection drives the luxury factor in tight quarters. The goal is visual richness without overwhelming the space, think large-format tiles, natural veining, and reflective surfaces that amplify light.
Marble, Quartz, and Natural Stone Options
Marble remains the gold standard for upscale bathrooms. Carrara, Calacatta, and Statuario varieties offer distinctive gray-to-gold veining that adds movement to walls and floors. In small baths, use 12×24-inch or larger slabs to minimize grout lines, which visually expand the room. Honed finishes reduce slip risk on floors: polished marble works well for vanity tops and accent walls but requires sealing every 6–12 months to resist moisture and staining.
Quartz delivers a similar aesthetic with less maintenance. Engineered slabs mimic marble or concrete and resist etching from toiletries. For vanity countertops, specify 3cm (1.25-inch) thickness for a substantial edge profile. Waterfall edges, where the countertop material continues down the side of the vanity, add a custom look without requiring extra square footage.
Natural stone alternatives include soapstone (naturally water-resistant, develops a patina over time) and limestone (warm tones, pairs well with brass or aged bronze fixtures). Both require sealing but offer texture that stands out against glossy tile or glass.
For flooring, large-format porcelain tile (24×24-inch or 12×24-inch planks) in marble or concrete looks mimics natural stone at a fraction of the cost and offers better slip resistance. Rectified edges allow for tight grout joints (1/16-inch), creating a nearly seamless appearance. Avoid small mosaics on floors in tiny baths, they fragment the space and make cleaning grout tedious.
Smart Layouts and Space-Saving Fixtures for Upscale Appeal
Luxury doesn’t require square footage, but it does demand efficient use of available space. Start by auditing the existing layout: most small baths suffer from oversized vanities, swing-door clearances, or poorly placed storage.
Wall-mounted (floating) vanities free up floor space, making the room feel larger and simplifying cleaning. Pair them with drawer-style storage rather than cabinet doors to maximize depth without clearance issues. Standard vanity depth is 21 inches: in a tight bath, drop to 18 inches for a slimmer profile without sacrificing usability. Specify soft-close hinges and undermount sinks for a high-end feel.
Compact toilets with concealed trapways and elongated bowls (not round-front) maintain comfort while streamlining the visual footprint. Wall-hung toilets go further by hiding the tank inside the wall (requires access panel for repairs), opening up floor space and simplifying tile installation.
For showers, frameless glass enclosures with inline or neo-angle configurations suit corners without the bulk of framed doors. In a tight footprint, consider a curbless (zero-threshold) shower with a linear drain. This requires sloping the bathroom floor slightly (per IRC R307.2, minimum 1/4-inch per foot toward the drain) but eliminates the visual break of a curb. Use large-format wall tile or solid-surface panels to reduce grout maintenance.
Skip the tub if space is under 50 square feet. A well-detailed shower with a built-in bench, rainfall showerhead, and handheld spray offers more utility and feels more luxurious than a cramped tub-shower combo. If a tub is non-negotiable, a 54-inch or 60-inch freestanding soaking tub in acrylic or cast iron can anchor the room, but this often requires relocating or eliminating other fixtures. Consult a plumber before committing: moving drain lines in a slab foundation or second-floor bath gets expensive fast.
Lighting Strategies That Create a Spa-Like Ambiance
Lighting transforms small bathrooms from utilitarian boxes into layered, inviting spaces. Luxury baths use three types of lighting: ambient (general), task (mirror/vanity), and accent (highlighting materials or features).
Ambient lighting starts with a well-placed ceiling fixture or recessed cans. In a bathroom under 60 square feet, two to three 4-inch or 6-inch IC-rated recessed LED downlights provide even coverage. Position them to avoid casting shadows on the mirror. For wet/shower locations, use fixtures rated for damp or wet conditions per NEC 410.10. Dimmer switches (compatible with LED loads) let users adjust brightness from bright task light to low evening glow.
Task lighting at the vanity is non-negotiable. Side-mounted sconces flanking the mirror (mounted 60–65 inches off the floor) eliminate shadows better than a single overhead fixture. Choose fixtures with frosted or opal glass shades to diffuse light and reduce glare. LED bulbs in 3000K (warm white) mimic flattering incandescent tones without the heat or energy draw. Avoid color temperatures above 3500K: they skew blue and feel clinical.
Accent lighting adds drama in small doses. Consider a recessed linear LED strip along a floating vanity’s underside, backlighting a mirror, or grazing a textured stone wall. Waterproof LED tape (IP65 or IP67 rated) works for niches or toe-kick lighting. Keep wattage low (under 5 watts per foot) to avoid overwhelming the space.
Natural light, if available, should be maximized. Replace a standard window with a frosted or textured glass unit for privacy without blocking daylight. Skylights or sun tunnels work in single-story or top-floor baths but require flashing details that meet local building codes to prevent leaks. If adding a skylight, hire a licensed roofer: improper installation voids warranties and invites water damage.
Sophisticated Color Palettes and Finishes
Color choice in a small bathroom sets the tone, literally. Light, monochromatic schemes enlarge the space visually, while darker, saturated hues create intimacy and richness when paired with good lighting.
Neutral palettes, soft whites, warm grays, beiges, and taupes, remain timeless and pair easily with natural stone and metal finishes. For walls, specify low-VOC, mildew-resistant paint in satin or semi-gloss (easier to clean than flat). Sherwin-Williams Emerald or Benjamin Moore Aura lines offer excellent moisture resistance for bathrooms.
Monochromatic schemes using varying shades of a single color (e.g., charcoal tile, mid-gray walls, light gray vanity) add depth without visual fragmentation. This approach works especially well in bathroom remodels where tile, paint, and fixtures need to cohere quickly.
Bold, dark colors, navy, forest green, charcoal, matte black, work in small baths if lighting is robust. Pair dark walls with polished chrome, brushed nickel, or unlacquered brass fixtures for contrast. Darker tones hide water spots and minor wear better than stark white but require consistent ambient and task lighting to avoid feeling cave-like.
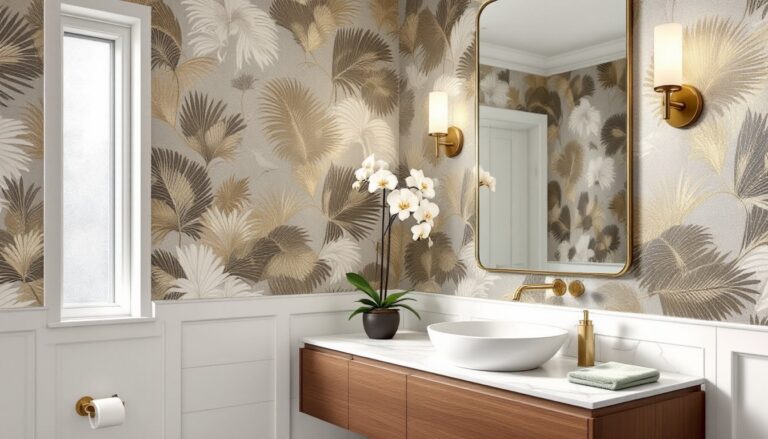
Finish consistency matters. Mixing too many metal finishes (chrome faucet, oil-rubbed bronze towel bar, polished nickel sconces) fractures the design. Stick to two finishes max: one for plumbing fixtures, one for hardware and lighting. Popular pairings include matte black faucets with brushed brass accents, or polished nickel throughout with matte white fixtures.
For tile, large-format, neutral-toned porcelain or stone keeps the palette grounded, while a single accent wall in patterned cement tile, zellige, or textured 3D tile adds interest. Grout color affects the final look: matching grout (e.g., white tile with white grout) creates a seamless surface: contrasting grout (white subway tile with dark gray grout) emphasizes the grid and adds a graphic edge.
Statement Features That Add Luxury Without Clutter
In a small bathroom, one or two standout elements make a stronger impression than a dozen half-hearted upgrades. Choose features that deliver visual or functional impact without eating up precious square footage.
Freestanding tubs, when space allows, anchor the room. A 60-inch acrylic or cast-iron soaking tub in white, matte black, or brushed metal finishes becomes the focal point. Freestanding tub fillers (floor-mount or wall-mount) eliminate the need for deck-mounted hardware and look cleaner. Budget $800–$3,000 for the tub, $300–$1,200 for the filler, plus plumbing labor.
Heated floors are a high-ROI comfort upgrade. Electric radiant floor mats (120V or 240V) install under tile or stone during a flooring refresh and cost $10–$15 per square foot in materials. A 40-square-foot bathroom runs roughly $400–$600 in materials, plus a dedicated GFCI-protected circuit. Pair with a programmable thermostat to preheat floors on a schedule. This is a DIY-friendly project if you’re comfortable with electrical work: otherwise, hire a licensed electrician.
Custom or semi-custom mirrors elevate the vanity area. Options include backlit LED mirrors (with integrated defoggers), pivot mirrors that tilt for adjustability, or medicine cabinets with mirrored fronts and interior lighting. Avoid builder-grade plate-glass mirrors: opt for at least 1/4-inch-thick glass with polished edges or metal frames. For those exploring luxury design trends, oversized round or arched mirrors are currently in favor and soften the hard lines typical of small baths.
Niche shelving in the shower provides storage without protruding hardware. A 12×24-inch recessed niche tiled in accent stone or mosaic holds toiletries and adds a custom detail. Frame it during stud-wall construction (requires blocking between studs per IRC R602.6 for structural integrity) or retrofit into non-load-bearing walls. Waterproofing is critical, use a pre-formed niche box with integrated pan and flashing, then tile over it.
Upgraded hardware and accessories, towel bars, robe hooks, toilet paper holders, should match fixture finishes. Solid brass or stainless steel (not zinc alloy) lasts longer and resists corrosion. Wall-mounted designs keep counters clear. For a cohesive look, source matching accessories from the same manufacturer as faucets and showerheads.
Finally, consider smart features that add convenience without bulk: motion-sensor lighting, Bluetooth-enabled exhaust fans with speakers, or touchless faucets. These integrate into standard rough-ins but require compatible electrical and plumbing setups. Always check local codes, some jurisdictions require licensed pros for fixture installations involving water and power.