Table of Contents
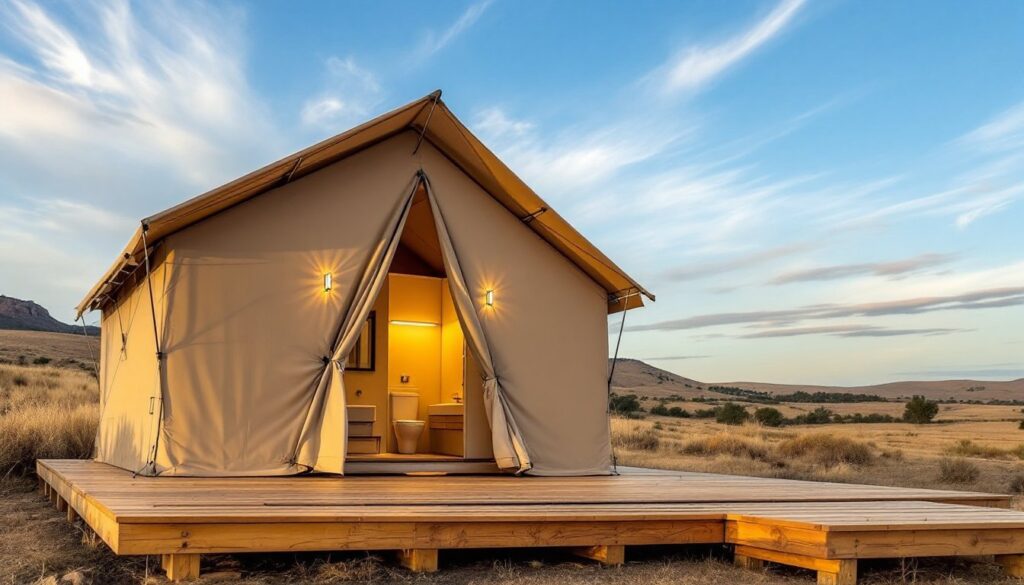
ToggleCamping used to mean sleeping on rocky ground and midnight treks to a freezing outhouse. Not anymore. Luxury tents with integrated bathrooms have transformed outdoor living into an experience that rivals boutique hotels, without sacrificing the connection to nature. These aren’t your weekend pop-up tents: they’re canvas structures with plumbing, climate control, and enough headroom to stand comfortably. Whether planning a backyard glamping setup, building a rental property, or creating a semi-permanent retreat on rural land, understanding the construction, utilities, and code requirements separates a successful project from an expensive mistake.
Key Takeaways
- Luxury tents with bathrooms use heavy-duty canvas and engineered foundations to create semi-permanent outdoor living spaces that rival boutique hotels while maintaining nature connectivity.
- Bathroom integration requires code-compliant plumbing including proper waste disposal, septic systems or composting toilets, and greywater management—many jurisdictions mandate site assessments before installation.
- Bell tents, safari-style tents, geodesic domes, and yurts each offer different layouts and durability; choose based on climate zone requirements, wind/snow load ratings, and usable square footage.
- Essential bathroom features include waterproof flooring with moisture barriers, dedicated exhaust ventilation (minimum 50 CFM), frost-resistant PEX plumbing, and GFCI-protected electrical systems.
- Total investment for luxury tents with integrated bathrooms ranges from $8,000–$35,000+ for the structure, plus $15,000–$25,000+ for site prep, utilities, and permits, with ongoing maintenance costs of $200–$400 annually.
What Makes a Luxury Tent Different from Standard Camping Tents?
Standard camping tents are temporary shelters, lightweight nylon or polyester stretched over aluminum poles, designed to collapse into a stuff sack. Luxury tents use heavy-duty canvas (typically 12-18 oz per square yard), powder-coated steel frames, and reinforced guy lines rated for sustained wind loads. They’re engineered as semi-permanent or seasonal structures, not overnight shelters.
The critical difference is utility integration. Luxury tents include anchor points for electrical conduit, plumbing chases, and ventilation ducts. Canvas walls often feature zippered panel inserts that accommodate HVAC lines, grey water drains, and waterproof grommets for utility penetrations. Floor systems range from treated plywood platforms on 4×4 skids to elevated composite decking on helical piers, depending on frost depth and drainage requirements.
Bathroom integration requires code-compliant plumbing. That means proper waste disposal, either connection to municipal sewer, a private septic system, or an approved composting toilet setup. Greywater from sinks and showers can’t just drain onto the ground in most jurisdictions. You’ll need percolation tests, drain fields, or holding tanks with scheduled pump-outs. If your site lacks sewer access, budget for a septic engineer’s site assessment before ordering the tent.
Structural ratings matter too. Luxury tents sold in the U.S. should reference snow load capacity (measured in pounds per square foot) and wind ratings. A tent rated for 20 psf snow load will handle most temperate climates: mountain or high-desert sites may require 30+ psf. Check your jurisdiction’s IBC (International Building Code) climate zone maps.
Types of Luxury Tents with Integrated Bathrooms
Bell Tents and Safari-Style Options
Bell tents feature a central pole (often 10-13 feet tall) with radial canvas panels creating a conical profile. Bathroom pods in bell tents are typically modular inserts, freestanding fiberglass or composite units placed against one wall, with plumbing run beneath the platform. Popular at luxury glamping retreats across California and the West, these setups work well on level sites with shallow utility trenches.
Safari-style tents use A-frame or ridge-pole construction with vertical sidewalls, providing more usable square footage. Bathrooms occupy a dedicated partition, often separated by canvas walls with zippers or a lightweight framed wall covered in waterproof backer board. Plumbing runs along the tent’s perimeter or beneath raised floors. These designs accommodate full-size fixtures: a 60-inch tub, standard vanities, and even low-flow toilets connected to pressurized water systems.
Canvas weight and waterproofing distinguish quality models. Look for marine-grade canvas treated with mildew inhibitors and UV stabilizers. Cheaper tents use polyester/cotton blends that sag when wet and degrade in direct sun within 2-3 seasons. Expect to re-treat canvas every 18-24 months with a water-repellent like silicone-based sealant (coverage: ~200 sq ft per quart).
Geodesic Domes and Yurt Designs
Geodesic domes use triangulated aluminum or galvanized steel frames covered in PVC-coated polyester or insulated fabric panels. Bathrooms are typically built-out modules, framed with 2×3 or 2×4 studs, sheathed in moisture-resistant materials like DensArmor Plus or cement board, then fitted with standard fixtures. Domes offer superior wind resistance (many rated to 100+ mph) and efficient heating due to minimal surface area.
Yurts use a lattice wall framework (traditionally wood, now often steel) with a compression ring at the roof’s center. Modern yurts designed for year-round use include insulated fabric layers, vinyl windows, and lockable doors. Bathrooms occupy a pie-slice section, framed conventionally and finished with tile or fiberglass surrounds. Plumbing is surface-mounted or run through the platform deck.
Both domes and yurts require engineered foundations. A floating deck on gravel works in mild climates, but frost-prone regions need footings below the frost line (typically 36-48 inches in northern states). Consult local building departments, some classify these structures as permanent dwellings, triggering full residential code compliance including egress windows, smoke alarms, and GFCI protection in wet areas.
Essential Features to Look for in a Luxury Bathroom Tent
Waterproof flooring is non-negotiable. The bathroom section needs a continuous moisture barrier, vinyl plank over 6-mil poly sheeting works, but ceramic tile on a mortar bed over cement board provides better long-term durability. Ensure flooring extends 6 inches up sidewalls as a splash guard. Any seams in the moisture barrier should overlap and be sealed with acoustical sealant.
Ventilation prevents mold and condensation. Bathrooms need dedicated exhaust fans (minimum 50 CFM for a 50 sq ft bathroom per IRC M1507.3) vented to the exterior, not just recirculating. Dome or roof-mounted turbine vents work if electrical isn’t feasible, but powered fans are more effective. Install a timer switch or humidity sensor to automate operation.
Plumbing fixtures should be low-flow and frost-resistant if the tent will be unheated seasonally. PEX tubing (cross-linked polyethylene) is easier to route than rigid copper and more forgiving in freeze conditions. Use compression fittings at fixture connections for serviceability. If running water isn’t available, consider a recirculating shower system that filters and reuses greywater, these require 12V pumps and dual-cartridge filtration but reduce water consumption by 70%.
Hot water options include tankless propane heaters (Eccotemp, Rinnai) mounted externally with freeze protection, or 12V electric models for off-grid setups paired with solar panels. A 6-gallon tank-style heater covers basic needs but adds weight and requires more energy. For cold-climate use, insulate all supply lines with foam pipe sleeves (minimum R-3 rating).
Lighting and electrical must meet NEC Article 550 (mobile structures) or local equivalents. GFCI protection is required within 6 feet of water sources. Use weatherproof boxes and conduit for any exterior runs. LED fixtures reduce load, critical if running on solar or generator power.
Setting Up Your Luxury Tent with Bathroom: Installation and Placement Tips
Site selection impacts everything. Avoid low-lying areas where water pools: even a 2-3% grade away from the tent prevents runoff infiltration. Check soil type, sandy or gravelly soils drain well: clay holds water and may require French drains or a raised platform. Test percolation if installing a septic system (dig a 12-inch test hole, fill with water, and measure drainage rate: most codes require 1 inch per hour minimum).
Before you dig, call 811 for utility locates. Even rural properties may have buried propane lines, well wiring, or irrigation. Mark your platform corners with stakes and run string lines to verify square (measure diagonals, they should match within 1/4 inch).
Platform construction starts with a level base. For a 16×20-foot tent, use doubled 2×8 or 2×10 rim joists on 16-inch centers, supported by concrete blocks or helical piers. Lay 3/4-inch tongue-and-groove plywood, screw it down with 2-inch deck screws every 8 inches along joists, and seal seams with construction adhesive. If the tent will be heated, add rigid foam insulation (R-10 minimum) beneath the decking.
Run plumbing and electrical before final decking. Drill holes for drain lines (minimum 2-inch ABS for toilets, 1.5-inch for showers/sinks) and supply lines (1/2-inch PEX for hot/cold). Slope drain lines 1/4 inch per foot toward the waste outlet. Stub-outs should extend 3-4 inches above decking for fixture connections. Pressure-test supply lines to 80 PSI for 15 minutes before covering.
Tent assembly usually takes two people and 4-6 hours. Follow the manufacturer’s torque specs for frame connections, under-tightening causes racking: over-tightening cracks fittings. Guy out all tensioning points before attaching canvas to prevent sagging. Use a level and plumb bob to ensure the frame is vertical: even a 2-degree lean creates door alignment issues.
Cost Considerations: Budgeting for Your Glamping Investment
Luxury tents with integrated bathrooms range from $8,000 to $35,000+ depending on size, materials, and included fixtures. A 16-foot bell tent with a basic bathroom pod (composting toilet, small sink, outdoor shower connection) starts around $8,000-$12,000. Safari tents (20×24 feet) with full plumbing, insulated walls, and premium finishes run $18,000-$28,000. Geodesic domes and engineered yurts with built-out bathrooms often exceed $30,000.
Site prep and utilities add significantly. Platform construction costs $15-$30 per square foot depending on foundation type and labor rates. Septic systems range from $3,000 (simple composting setup) to $15,000+ (engineered drain field). Electrical service installation (trenching, panel, wiring) averages $2,000-$5,000 if extending from an existing building: off-grid solar systems with battery storage start at $8,000 for basic needs.
Permit fees vary by jurisdiction but budget $500-$2,000 for building permits, septic permits, and inspections. Some counties classify luxury tents as RVs (exempt from building codes), others as permanent structures requiring full plan review. Contact your building department early, retrofitting to meet codes after installation is expensive.
Ongoing costs include canvas retreatment ($200-$400 every two years), propane or heating fuel, and septic pump-outs ($200-$400 annually). Factor in winterization if closing seasonally: draining lines, removing fixtures, and covering the structure.
For those drawing inspiration from garden design ideas or rustic country-style home projects, luxury tents offer a middle path between permanent construction and temporary camping, but treat the investment seriously. Cutting corners on drainage, insulation, or structural anchoring leads to mold, frozen pipes, and canvas damage that quickly exceeds initial savings.